Mail Manager Main
Menu
Web Mail
Add/Remove Accounts
Default Address
Autoresponders
E-mail Filtering
Forwarders
Mailing Lists
Spam Assassin
Trace an E-mail Address
Modifiy Mail Exchanger (MX Entry)
 The Mail
area allows you to manage all aspects of your e-mail, from adding new accounts,
managing mailing lists, and setting spam filters. There are quite a number of
options available, so take your time.
The Mail
area allows you to manage all aspects of your e-mail, from adding new accounts,
managing mailing lists, and setting spam filters. There are quite a number of
options available, so take your time.
Note: All e-mail options can
be used in conjunction with each other. For example, you could set up an
autoresponder on your main account to e-mail an "Out of Office" message, a
forwarder to send the e-mail to your uncle's house where you are staying, and a
spam filter to reject all e-mail with "credit" in the subject line. This
flexibility is what makes e-mail so powerful as a communication medium.
To open the Mail area:
- Click on the Mail button on
the home page.

 You can read your online e-mail using NeoMail, Horde, or SquirrelMail. All of
these popular web mail applications allow you to read your e-mail, save them,
keep an address book, and perform all of the other basic e-mail functions that
you are used to. The main difference between web mail and an offline e-mail
applications, such as Eudora or Microsoft Outlook Express, is that all of these
functions are performed online, rather than on your own computer, and offline
applications generally provide more features.
You can read your online e-mail using NeoMail, Horde, or SquirrelMail. All of
these popular web mail applications allow you to read your e-mail, save them,
keep an address book, and perform all of the other basic e-mail functions that
you are used to. The main difference between web mail and an offline e-mail
applications, such as Eudora or Microsoft Outlook Express, is that all of these
functions are performed online, rather than on your own computer, and offline
applications generally provide more features.
Web mail is optional. You can still use your
favorite offline e-mail applications, if you prefer. You can even use a
combination of web mail applications and another tool - you can check your
e-mail online, perhaps when you're at work, and download your e-mail to your
computer when you get home. You can automatically configure
Outlook Express, or manually configure other mail applications to read your
e-mail offline.
To read your e-mail online:
- Click on the Web Mail link
in the Mail area to access your default e-mail account, or click on the
Add/Remove accounts link and click on the Read
Webmail button next to the account that you want to read.
Note: You can also save this
link as a bookmark, so that you can access it without having to use CPanel.
- Click on the web application that you would
like to use.
- You are now in the web mail window for your
default e-mail address. Refer to the following links if you need more
information about the web mail application you are using:
- NeoMail summary

NeoMail is fairly self-explanatory. The text
below describes the main buttons in NeoMail and what they do. This is provided
as a summary reference, and not a detailed description of how to use NeoMail.
If you do not know how to use some of the features, have a look at the
NeoMail home page.
Note:
You can not use HTML code in NeoMail - plain text only.
NeoMail functions:
-
 Inbox
- Choose a folder to display. The default folder is your Inbox.
Inbox
- Choose a folder to display. The default folder is your Inbox.
-
 Compose - Compose a new e-mail message and send it using the
Send button. You can not use HTML code - plain text only.
Compose - Compose a new e-mail message and send it using the
Send button. You can not use HTML code - plain text only.
-
 Refresh - Refreshes the displayed page. Use it to check if new mail
has arrived since the window was opened.
Refresh - Refreshes the displayed page. Use it to check if new mail
has arrived since the window was opened.
-
 User Preferences - Displays the Preferences page,
which allows you to set a variety of options., such as default language,
number of messages displayed per page, and your e-mail signature.
User Preferences - Displays the Preferences page,
which allows you to set a variety of options., such as default language,
number of messages displayed per page, and your e-mail signature.
-
 Address Book - Displays your Address Book of saved
e-mail addresses. Click on an address to create a new e-mail with their
e-mail address automatically added.
Address Book - Displays your Address Book of saved
e-mail addresses. Click on an address to create a new e-mail with their
e-mail address automatically added.
-
 Folders - Allows you to create new folders and delete old ones.
Useful for organizing your e-mail.
Folders - Allows you to create new folders and delete old ones.
Useful for organizing your e-mail.
-
 Empty Trash - Empties the neomail-trash folder.
-
 Logout - Closes the connection between you and NeoMail.
-
 Page Navigation - Navigate to the first, previous, next, last, or
specific page of e-mail.
Page Navigation - Navigate to the first, previous, next, last, or
specific page of e-mail.
-
 Move - Moves the selected items to the displayed folder - the
default folder is the trash. Click on the on the tick box next to the
specific message to select, or click on the All tick box to
select all messages in this window.
Move - Moves the selected items to the displayed folder - the
default folder is the trash. Click on the on the tick box next to the
specific message to select, or click on the All tick box to
select all messages in this window.
- Horde summary

SquirrelMail is a full-featured e-mail
application. The text below describes the main buttons in Horde and what they
do. This is provided as a summary reference, and not a detailed description of
how to use Horde. If you do not know how to use some of the features, have a
look at the Horde home
page.
Horde functions (available from the
top menu bar):
-
 -
Displays your inbox with all your current mail that has not been viewed,
moved, or deleted.
-
Displays your inbox with all your current mail that has not been viewed,
moved, or deleted.
-
 - Write a new e-mail message. There are several options available, such as
using an address book to choose the recipient(s) of your e-mail, adding
attachments, and using special characters in the e-mail.
- Write a new e-mail message. There are several options available, such as
using an address book to choose the recipient(s) of your e-mail, adding
attachments, and using special characters in the e-mail.
-
 - Organize your mail messages into different folders. You can have as many
different folder as you want.
- Organize your mail messages into different folders. You can have as many
different folder as you want.
-
 - Set a large number of options on how you use Horde. Please read the
description of a setting carefully before applying it.
- Set a large number of options on how you use Horde. Please read the
description of a setting carefully before applying it.
-
 -
Search for a particular e-mail message. You can search by any field in the
e-mail and search through any folder.
-
Search for a particular e-mail message. You can search by any field in the
e-mail and search through any folder.
-
 -
Displays the Horde online help. Please read this help when you have any
questions or problems.
-
Displays the Horde online help. Please read this help when you have any
questions or problems.
-
 - Stores e-mail addresses of contacts. Click on any e-mail address to create
a new e-mail message to that person.
- Stores e-mail addresses of contacts. Click on any e-mail address to create
a new e-mail message to that person.
-
 -
Logs you out of the Horde application. You should always do this when you
have finished using Horde.
-
Logs you out of the Horde application. You should always do this when you
have finished using Horde.
Additional Horde functions (available
from the bottom menu bar):
-
 - Displays a calendar on which you can enter events.
-
 -
Create notes for your future reference.
-
Create notes for your future reference.
-
 -
Create a list of tasks that you need to perform.
-
Create a list of tasks that you need to perform.
- SquirrelMail summary

SquirrelMail is a full-featured e-mail
application. The text below describes the main buttons in SquirrelMail and
what they do. This is provided as a summary reference, and not a detailed
description of how to use SquirrelMail. If you do not know how to use some of
the features, have a look at the
SquirrelMail home
page.
SquirrelMail functions:
- Compose - Write a new
e-mail message. There are several options available, such as using an
address book to choose the recipient(s) of your e-mail, adding attachments,
and choosing a signature.
- Addresses - Stores e-mail
addresses of contacts. Click on any e-mail address to create a new e-mail
message to that person.
- Folders - Organize your
mail messages into different folders. You can have as many different folder
as you want.
- Options - Set a large
number of options on how you use SquirrelMail. Please read the description
of a setting carefully before applying it.
- Search - Search for a
particular e-mail message. You can search by any field in the e-mail and
search through any folder.
- Help - Displays the
SquirrelMail online help. Please read this help when you have any questions
or problems.
You can set up as many POP (Post Office
Protocol) e-mail accounts as you require, up to your maximum limit. Each one of
these is in the standard e-mail formation of address@yourdomain.com. As with
your default e-mail address, you can access these accounts through web mail or
through your own offline e-mail application.
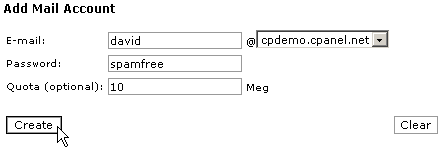
To add an e-mail account:
- Click on the Add/Remove Accounts
link in the Mail area.
- Click on the Add Account
link.
- Enter the first part of the e-mail address
and the password for the account in E-mail and
Password fields.
- Enter the maximum size limit of this mailbox
in the Quota field, if required. The size limit is in
megabytes. Not entering a number means that the mailbox size is only limited
by the available disk space.
- Click on the Create button.
- Your new account has been added. Refer to
Configuring Outlook Express to read e-mail if you want to use Outlook
Express to read e-mail received by the new account.
Because Microsoft Outlook Express is the most
popular e-mail application available, you can automatically configure Outlook
Express from CPanel. This saves time in manually configuring your e-mail
application and avoids errors.
Note: This will only work if
you have Microsoft Outlook installed on your machine and are running any version
of Windows.
To automatically configure Outlook
Express:
- Click on the Add/Remove Accounts
link in the Mail area.
- Click on the Outlook (Express)
AutoConfig link next to the required account.
- Read the message in the alert window and
click on the OK button. You may need to repeat this step two
or three times.
- Click on the Open this file from its
current location radio button, and click on the OK
button in the File Download window.
- Click on the Yes button in
the Registry Editor window and repeat for the last window. Outlook Express has
now been configured for this account. You need to repeat this process for as
many accounts as you want to access through Outlook Express
It is useful to occasionally change the
passwords on your e-mail accounts to maximize your e-mail security. You should
always change your password if you think someone else has
access to your account.
Note: Make sure that you
change the password in your offline e-mail application as well, or you will not
be able to upload or download e-mail to this account.
To change the password of an e-mail
account:
- Click on the Add/Remove Accounts
link in the Mail area.
- Click on the Change Password
button next to the required e-mail address.
- Enter the new password in the New
Password field.
- Click on the Change button.
Your password has now been changed for that account.
You can delete an e-mail account when the
account is no longer needed. You can not delete your default account.
Warning: Make sure you
download any mail that you want to keep, as deleting the account will delete all
of the mail still in that account. You can not recover this information once the
account has been deleted.
To delete an e-mail account:
- Click on the Add/Remove Accounts
link in the Mail area.
- Click on the Delete button
next to the unwanted e-mail address.
- Click on the Yes button.
Setting your default e-mail address
Any e-mail that is sent to an unknown account
at your domain name, such as unknown@yourdomain.com, gets automatically rerouted
to your default e-mail account. All web site accounts are automatically assigned
a default e-mail address - user@yourdomain.com - which you can change, if
required.
To set your default e-mail address:
- Click on the Default Address
link in the Mail area.
- Click on the Set Default Address
link.
- Enter the complete e-mail address of the new
default in the field next to your web site name drop-down list.
Note: You can enter :blackhole:
to throw away all incoming mail, or :fail: no such address here
to bounce the e-mail back to the sender.
- Click on the Change button.
Your new default e-mail address has now been set.

Autoresponders
Autoresponders are e-mail messages that are
sent automatically when an e-mail arrives for a specific e-mail account.
Autoresponders are most commonly used for an "Out of Office" style message to
inform your correspondents that you are not available, without you having to
reply manually. You can have more than one autoresponder on one account. You can
use plain text or include HTML code in the autoresponder, and choose from a wide
variety of character sets.
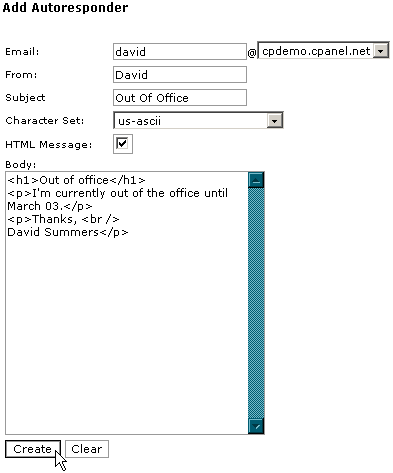
To add an autoresponder:
- Click on the Autoresponders
link in the Mail area.
- Click on the Add Autoresponder
link.
- Enter the address of the account that the
autoresponder responds to in the Email field.
- Enter your name or address in the
From field. You do not have to put anything in this field.
- Enter the subject line of the autoresponder
in the Subject field.
- Click on the required character set for this
autoresponder from the Character Set drop-down list, if
required.
- Click on the HTML Message
tick box if you want to include HTML code in the autoresponder.
- Enter the autoresponder message in the
Body field. You can not use HTML code in this field - plain
text only.
- Click on the Create button.
Modify an autoresponder if you need to alter
the details of the message or if you set it to the wrong account.
To edit an autoresponder:
- Click on the Autoresponders
link in the Mail area.
- Click on the Edit button
next to the autoresponder that you want to edit.
- Edit the autoresponder's fields as required.
Refer to
Autoresponders if you are not sure what you can do in each field.
- Click on the Create button
to edit the autoresponder.
Delete an autoresponder when you no longer need
to use it. If you use the autoresponder at frequent intervals, such as an "Out
of Office" message, you can modify it to point to a nonexistent e-mail account,
such as store@yourdomain.com, and then simply change the account name back when
you need it again. Refer to Editing an autoresponder (above) for more
information.
To delete an autoresponder:
- Click on the Autoresponders
link in the Mail area.
- Click on the Delete button
next to the autoresponder that you want to delete.
You can block an e-mail using spam filters.
There are many definitions of spam, but one particularly useful one is the
following:
E-Mail
Filter
Spam is the electronic version of junk mail,
and has been around since the Internet was created. E-mail filters are a way of
filtering your e-mail to remove unwanted mail based on a variety of criteria.
You can block any sort of e-mail, not just mail of a commercial nature. Blocked
mail can be deleted automatically or sent to another e-mail address or script.
These filters are quite flexible - some examples are provided after the
instruction on how to add a spam filter below. All filters are cumulative.
Useful spam links:
Also refer to
Spam Assassin for
another approach to dealing with spam.
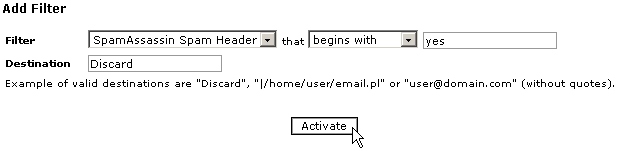
To add an e-mail filter:
- Click on the E-mail Filtering
link in the Mail area.
- Click on the Add Filter
link.
- Click on the required header field in the
first drop-down list. These are the various fields in any e-mail message.
- Click on the required filter action in the
second drop-down list. This action will act on the text entered in the third
field.
- equals - match the text
exactly (whole words only). "Credit" will block "Credit".
- matches regex - matches
the text based on regular expression (regex) rules. Regular expressions are
a powerful but complex area. You do not need to use regular expression
filters for most circumstances. Refer to these two good introductory
tutorials -
Using Regular Expressions and
Learning to Use Regular Expressions - for more information.
- contains - match the
specified text in any circumstance. "porn" will block "porn" and
"pornography".
- begins with - match the
specified text when it is the beginning of a word. "porn" will block "porn"
and "pornography" but not "teenporn".
- Enter the filter text in the third field.
This text is case sensitive.
- Enter the destination for the filtered
e-mail in the Destination field. There are three separate
types of destination:
- Destroy the e-mail -
Enter Discard in the field.
- Redirect to another address
- Enter the e-mail address to which to redirect the e-mail.
- Redirect to a script -
Enter the full script path on the machine that hosts your web site.
- Click on the Activate
button.
Example:
- To redirect all e-mail from "john@paradise.net",
enter: From, equals, john@paradise.net,
david@corse.org.nz
- To delete all e-mail from paradise.net,
enter: From, contains, paradise.net,
Discard
- To delete all references to pornography,
enter: Any Header, contains, porn,
Discard
- To discard all e-mail that Spam Assassin has
marked as spam, enter: SpamAssassin Spam Header,
begins with, yes, Discard
Delete a spam filter when you no longer need
it. There is no way to modify a spam filter - if you have made a mistake, simply
delete the filter and start again.
To delete a spam filter:
- Click on the E-mail Filtering
link in the Mail area.
- Click on the Delete button
next to the spam filter that you want to delete.
Forwards simply allow you to automatically
forward e-mail sent to one account to another account. This is useful when you
work at two separate locations, or have gone on holiday.
To forward mail from one account to two or more
accounts, just add two or more forwards for the account that is being forwarded.
E-Mail
Forwarder
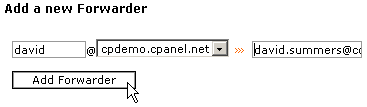
To add a forwarder:
- Click on the Forwarders
link in the Mail area.
- Click on the Add Forwarder
link.
- Enter the first part of the e-mail address
that will be forwarded in the first field.
- Choose the required domain from the
drop-down list.
- Enter the full e-mail address that the
forwarder will forward mail to in the second field.
- Click on the Add Forwarder
button.
Delete a forwarder when you no longer need it.
You can not modify an e-mail forwarder - if you have made a mistake, simply
delete the forwarder and start again.
To delete an e-mail forwarder:
- Click on the Forwarders
link in the Mail area.
- Click on the Delete button
next to the forwarder that you want to delete.
Mailing List
Mailman is a popular mailing list script.
Mailing lists are an ideal tool for communication between far-flung participants
and can be about anything you want. Mailman allows you to set up a mailing list
with a large number of configurable options, such as who is on the list, where
mailing lists messages are sent, and whether you include welcoming messages to
new subscribers.
The Mailman documentation, which is
incorporated into its Administration panel, is clear and helpful, and should be
referred to for all questions about using the script. The instructions in this
section deal with how to set up, modify, and delete a Mailman mailing list from
your CPanel. You can can also refer to the
Mailman home page for more information.
Note: It is a good idea to be
aware of spam and its definition before setting up a mailing list - refer to
E-mail Filtering
for more information.
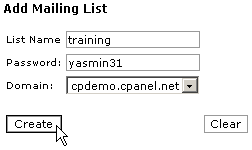
To add a mailing list:
- Click on the Mailing Lists
link in the Mail area.
- Click on the Add Mailing List
link.
- Enter the name of the mailing list in the
List Name field, the password for the list in the
Password field, and the domain it is for from the Domain
drop-down list.
- Click on the Create button.
The list is created in the /usr/local/cpanel/3rdparty/mailman/lists
folder.
There are many different configurable options
available with the Mailman script. This procedure shows you how to open up the
Administration panel so that you can modify the script options. Use the Mailman
documentation that is included in the Administration panel to answer any
specific questions you might have.
To edit a mailing list:
- Click on the Mailing Lists
link in the Mail area.
- Click on the Edit button
next to the mailing list that you want to edit.
- Log in to the mailing list with your
password. You are now in the Mailman Administration panel and can adjust
options as you require.
Delete a Mailman mailing list when you no
longer want the list to be active.
Warning: Deleting the mailing
list will delete all archives, current mail, and members e-mail addresses. If
you want to keep any of this information, be sure to download or otherwise copy
these files before deleting the mailing list. Once the mailing list is deleted
the information is unrecoverable.
To delete a mailing list:
- Click on the Mailing Lists
link in the Mail area.
- Click on the Delete button
next to the mailing list that you want to delete.
- Click on the Yes button.
Spam Assassin
Spam Assassin is a mail filter installed on a
mail server used to identify spam. It checks for spam using a large number of
pre-set rules that check the header, body, and sender of all e-mail messages
sent to your domain mailbox. For more information about Spam Assassin, refer to
the following links:
Also refer to E-mail Filtering (above) for more
information about spam and setting up filters.
To enable Spam Assassin:
- Click on the Spam Assassin
link in the Mail area.
- Click on the Enable Spam Assassin
button.
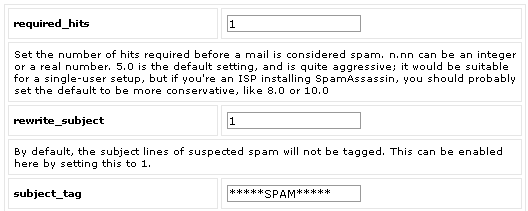
You can change how Spam Assassin deals with
spam. The following options are available:
- required_hits - The number
of e-mails received before a certain e-mail is considered spam.
- rewrite_subject - Alter the
subject line of spam e-mail. Enter 1 to enable or 0
to disable.
- subject_tag - Text added to
the subject line of spam e-mails. rewrite_subject must be
enabled for this to work.
- blacklist_from - Enter an
e-mail address that you always want classified as spam. The asterix symbol (*)
can be used as a wildcard.
- whitelist_from - Enter an
e-mail address that you never want classified as spam. The asterix symbol (*)
can be used as a wildcard.
To configure Spam Assassin
- Click on the Spam Assassin
link in the Mail area.
- Click on the Configure Spam Assassin
button.
- Change the settings as required.
- Click on the Save button.
The Spam Assassin Spam Box is a separate mail
folder called "spam". If enabled, all e-mail that Spam Assassin flags as spam is
automatically delivered to the "spam" folder.
Note: You need an IMAP e-mail
client, such as Horde, to view the Spam Box (refer to
Horde summary for
more information).
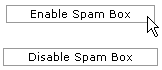
To enable or disable the Spam Box:
- Click on the Spam Assassin
link in the Mail area.
- Click on the Enable Spam Box
or Disable Spam Box as required.
You can disable Spam Assassin whenever you
require. If you are not able to receive a non-spam e-mail it is a good idea to
disable Spam Assassin and have the e-mail resent.
To disable Spam Assassin:
- Click on the Spam Assassin
link in the Mail area.
- Click on the Disable Spam Assassin
button.
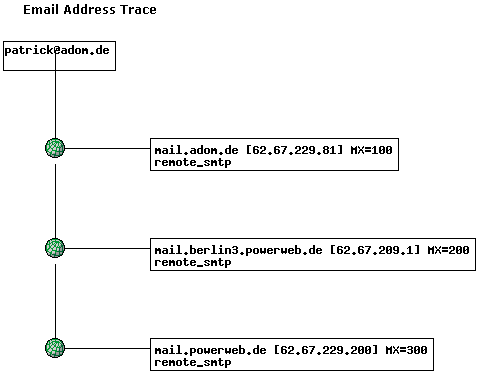
CPanel enables you to trace the delivery path
of an e-mail address, from server to server, to your web site.
To trace an e-mail address:
- Click on the Trace an E-mail Address
link in the Mail area.
- Enter the e-mail address that you want to
trace in the available field.
- Click on the Show Route
button.
Altering your Mail Exchanger
(MX Entry) setting
CPanel manages your e-mail through its own mail
server. However, by altering your MX (Mail Exchange Record) Entry you can point
your e-mail to another mail server, if this is required.
Note: CPanel will not be able
to manage your e-mail if you change your MX Entry setting. Do not change your MX
Entry unless you know what you are doing.
To alter your MX Entry setting:
- Click on the Modify Mail Exchanger (MX
Entry) link in the Mail area.
- Click on the Change an MX Entry
link.
- Enter the domain name of the new MX Entry in
the available field.
Note:
You can only change the entry to a domain name (e.g. yourdomain.com),
not an IP (Internet Protocol) address.
- Click on the Change button.
