The following CGI Scripts are pre-installed and
ready to use one your account:
Simple CGI Wrapper
This is a CGI Wrapper that will allow you to run CGI Scripts with your User ID.

Random HTML
This is a Random HTML generator. It picks a string of HTML code from a list and
inserts it in an SSI (Server Side Includes) enabled web page.
Simple GuestBook
This is a just a simple guestbook for your visitors to view and sign.
Advanced GuestBook
This is a more advanced guestbook written in PHP and MySQL.
Counter
You can create a counter to count and show how many visitors have been to your
site.
Clock
This utility will create a real time java clock for your site.
Countdown
You can create a countdown box to countdown to a specified date.
CGI EMail
CGI Email takes the input of an HTML form and converts it to an email format
defined by the author of the form.
FormMail Clone
FormMail-clone is a clone of Matt Wright's FormMail.
Entropy Search
Setup Search Engine
Rebuild Search Index
Entropy Banner
This feature allows you to create rotating banner ads for your site.
 This
CGI Center area allows you to use some pre-installed CGI scripts through CPanel.
This
CGI Center area allows you to use some pre-installed CGI scripts through CPanel.
CGI (Common Gateway Interface) is a standard
for running external programs from a Web server. CGI allows the returned HTML
page to be dynamic - for example, with a CGI script you could access information
in a database and format the results as part of an HTML page. Not surprisingly,
CGI scripts are very popular and used extensively throughout the World Wide Web.
There are a number of very good introduction to
CGI documents available on the Web. The information given below is a summary of
the most important points to remember when using CGI. Please refer to the
following for a more in-depth introduction:
Key points to bear in mind when using CGI
scripts:
- The pre installed scripts available through
CPanel are the easiest to use, but if a certain script does not do exactly
what you want, feel free to look for better scripts on the Web. You can
usually find a script to do almost anything, especially if you are prepared to
pay.
- Read all available documentation on a
particular script before using it. This will help avoid most problems.
- CHMOD ("Change Mode") means change the
permissions on a particular file (usually the script itself). The CPanel File
Manager allows you to quickly do this, as do most FTP tools.
- Important - after uploading
cgi-bin scripts, CHMOD to 755
(unless the script documentation specifically states otherwise). For example,
you need to CHMOD the pre-installed CPanel
CGI EMail scripts to
755 to use them properly.
- Many scripts need to know the path to Perl
(scripting language engine) and to sendmail (HTTP mail engine). You can find
this information on the front page of CPanel.
- Make sure you test your scripts repeatedly!
Testing is vital to make sure everything is working to your satisfaction.
The CGI Wrap script creates a scgi-bin
folder at the public_html level of your web site. This allows
you to run scripts with your own user ID.
The advantage of this is that you can run
scripts that have the same permissions that you do - you can write, edit, and
delete files as you normally do. In a regular cgi-bin folder,
you can only do this if you set your directory permissions to 777 (world access)
and file permissions to 666, both of which are quite dangerous as anyone can now
modify your web site.
The disadvantage of this is that if there is a
security breach in your script that another person can exploit, they have access
to your site in the same manner that you do - they can do anything. However, as
long as the scripts you run in the scgi-bin directory are
secure, you have nothing to worry about.
Be sure to read the
CGI Wrap user guide
for more detailed information on using CGI Wrap.
For a more detailed description of the
distinction between normal and wrapped cgi, refer to this
article.
To install the Simple CGI Wrapper:
- Click on the Simple CGI Wrapper
link in the CGI Center area.
Your scgi-bin folder has now been set up. All cgi scripts
that you would like to run under your own user ID should be placed in this
folder.
This simple script allows you to insert random
pieces of text into your web page. This is useful for daily quotes, helpful
hints, or any other place where random text is useful.
To install the Random HTML script:
- Click on the on the Random HTML
link in the CGI Center area.
- Enter each piece of random text in the box
and make sure you put each piece of text on a new line. You can not include
new paragraphs within the one piece of text, as the script will separate each
new paragraph into a new piece of text.
- Copy and paste the tag at the top of the
page into your web page at the appropriate place.
- Change your web page extension from .htm or
.html to .shtml. This is the required file extension to use SSI (Server Side
Includes).
- Click on the Save button.
- Upload the web page and test the script.
This is a simple guestbook script that allows
you to create a guestbook that your visitors can sign. You can modify the
appearance of the guestbook, and view and manage guestbook entries.
Note: A
more advanced
guestbook, with many more features, is also available. However, this does
take more time to set up, and requires some MySQL knowledge.
To create a guestbook:
- Click on the Simple Guestbook
link in the CGI Center area.
- Copy and paste the HTML code at the bottom
of the page to your web page. Feel free to alter the appearance of the form -
as long as all the fields are available, the script will still work correctly.
This is the minimum you need to do to get the
script working - upload the file, and you're finished. Refer to
Modifying the guestbook template if you need to customize the appearance
of the guestbook.
- Upload the finished HTML page to test the
script.
You can modify the appearance of your guestbook
template at any time.
To modify the guestbook template:
- Click on the Simple Guestbook
link in the CGI Center area.
- Click on the Edit Guestbook Template
link.
- Copy and paste any HTML code that you want
into the template to alter it's appearance.
- Click on the Save button.
- Upload the finished HTML page.
You will want to be able to view your guestbook
once visitors start leaving comments. You can keep the guestbook private, or you
can set it up so that anyone can view the guestbook.
To view the guestbook:
- Click on the Simple Guestbook
link in the CGI Center area.
- Click on the View Guest Book
link.
- You can now view the guestbook. If you want
to make the guestbook available to anyone, open the viewing page in its own
frame (right-click in Internet Explorer).
- Copy the URL show in your browser when
viewing the guestbook and make it a link on the same page as the sign-in form.
You may want to delete entries in your
guestbook, either when the page gets too large or if you do not want to keep
certain entries. This is easily handled through CPanel.
To view the guestbook:
- Click on the Simple Guestbook
link in the CGI Center area.
- Click on the Manage Guest Book
link.
- Click on the Delete This Entry
link above any entry that you no longer want.
The Advanced Guestbook script offers more
features than the
Guestbook script by using PHP and a MySQL database.
Refer to
Managing
the Advanced Guestbook if you need to manage your Advanced Guestbook after
it has been set up.
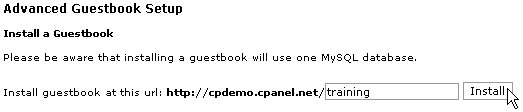
To install the Advanced Guestbook
script:
- Click on the Advanced Guestbook
link in the CGI Center area.
- Enter the directory in which to install the
Advanced Guestbook in the available field. This must be a top-level directory
on your site.
- Click on the Install
button.
- Click on the available link to change the
admin password on the site.
You can manage all aspects of each Advanced
Guestbook that has been set up at any time.
To manage an Advanced Guestbook:
- Click on the Advanced Guestbook
link in the CGI Center area.
- Click on the required Guestbook in the
Modify an existing Guestbook area.
Counter
The Counter Maker script allows you to create
three different items that you can put on your web pages:
Counter
This is a simple counter that displays the
number of times a particular web page has been accessed. By putting a counter on
your home page, you can keep track of how many visitors have looked at your web
site since the counter was created. This is useful not only for your own
information, but as a means of showing visitors how popular your site is.
Clock
This is a simple clock that displays the time
for the set time zone. It updates each time the page is loaded.
Another available CGI script is a
Java clock, which displays
the time dynamically, just like a digital watch. However, Java may not be an
acceptable technology to use, depending on the browsers your visitors are using.
Date
This is a simple date display that can be
customized to display in a number of different formats.
All three items can be heavily customized, as
required. You can do the following:
- Choose the display style from a large number
of available styles.
- Further customize the display style by
replacing one color with another.
- Choose the frame color and thickness around
the item.
- Set time and date formats.
- Preview the item.
To create a counter, clock, or date:
- Click on the Counter link
in the CGI Center area.
- Click on the Counter,
Clock, or Date radio button.
- If you are creating a clock, choose the time
zone and format options in the TimeZone and
TimeFormat drop-down lists.
- If you are creating a date display, choose
the required date format in the Date Format field. M = Month,
D = Day, and Y = Year.
Example: If you choose the MMDDYY option, the
25th of December, 2003 will be displayed as 12- 25- 2003. If you choose the
DDMMYY option, the same date would be displayed as 25- 12- 2003.
- Enter the thickness of the border around the
item in the Frame Thickness field. Zero removes any border
around the item.
- Choose the maximum digits in your counter,
if required.
- Choose the style for the item from the
Style drop-down list. To see an example of all of the styles,
click on the See Styles link.
- Enter the red, green, and blue values for
the border in the Frame Color fields. Click on the
Preview button to see the border color. Most graphics programs will
show you RGB colors, as will the Windows Color Picker.
- Enter the name of the counter in the
Counter Name field. You can not duplicate item names within the same
CPanel.
- Click on the Preview button
to see what your item will look like. Alter the criteria fields and keep
previewing until you are happy with the finished product.
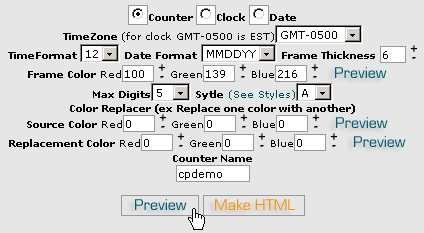
- Click on the Make HTML
button to create the HTML code that you can cut and paste into your HTML page
where you want it.
- Upload your new HTML page to see how it
works.
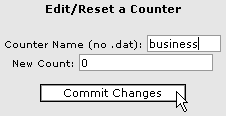
You may need to reset a counter to 0 at some
stage, or set the counter number to some other number. This is easily handled in
CPanel.
To reset your counter:
- Click on the Counter link
in the CGI Center area.
- Enter the name of the counter in the
Counter Name field.
- Enter the new count number in the
New Count field.
- Click on the Commit Changes
button.
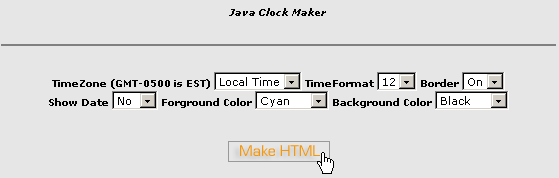
Clock
The Java Clock Maker allows you to create a
real-time, dynamic clock, that counts the time just like a digital wrist watch.
To create a Java clock:
- Click on the Clock link in
the CGI Center area.
- Choose the time zone and format for the
clock in the TimeZone and TimeFormat
drop-down lists.
- Choose whether you want a border or not in
the Border drop-down list.
- Choose whether you want the date to be shown
in the Show Date drop-down list.
- Alter the display and background colors in
the Foreground Color and Background Color
drop-down lists.
- Click on the Make HTML
button to preview the clock and create the HTML code to make it work. Alter
the clock and preview the result until you are happy with the display.
- Copy and paste the HTML code to your web
page.
- Upload your new HTML page to test the
results.
Java CountDown/CountUp
Maker
This script creates a Java countdown or countup
display, to or from a particular time.
Note:
This Java applet, while easy to use, is only minimally
customizable and does not present very well. Feel free to use the script as long
as you understand these limitations.
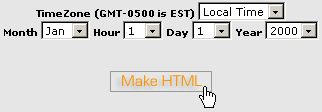
To set up the Java CountDown/CountUp
Maker
- Click on the Countdown link
in the CGI Center area.
- Choose the time zone for the clock in the
TimeZone drop-down list.
- Enter the date that you are counting down to
or up from in the Month, Hour, Day,
and Year drop-down lists.
- Click on the Make HTML
button to preview the countdown and create the HTML code to make it work.
Alter the countdown and preview the result until you are happy with the
display.
- Copy and paste the HTML code to your web
page.
- Upload your new HTML page to test the
results.
CGI E-Mail
CGI EMail is a simple, easy-to-use script that
takes the results of any form and sends them to you via e-mail. Because it is
already installed, minimal configuration is required to successfully use the
script.
The following steps provide quick summarized
instructions for CGI EMail. Be sure to read the
CGI user guide
for detailed instructions on using CGI EMail.
To configure CGI E-Mail:
- Create an HTML form with a number of named
input fields. Refer to
this page for
more detailed information of the action component of the form.
- Create an e-mail template (a .txt file) that
displays the format in which you want your form information displayed in the
e-mail. Make sure all your form name codes are one word and in square brackets
[].
- Upload the .txt and form files to your site.
- Go to your cgi-bin
directory and change the file permissions on cgiecho and cgie-mail to 755.
- Test the script. The cgiecho script is
designed for testing online, so you do not have to wait for e-mail to be sent
or received.
FormMail Clone
One of the most popular form to e-mail scripts
available is FormMail, by Matt Wright. The script can be setup very quickly, and
provides a number of customization options. CPanel was written a clone of
FormMail which operates in the same manner.
The following steps provide quick installation
instructions for FormMail Clone. Be sure to read the FormMail README file for
more detailed information about customizing FormMail Clone.
Refer to the
FormMail documentation for more information about customizing the FormMail
clone script.
To set up FormMail Clone:
- Create the form on your web page, with the
following fields:
<form action="http://www.yourdomain.com/cgi-sys/FormMail.cgi" method="POST">
<input type="hidden" name="recipient" value="e-mail@yourdomain.com">
<input type="hidden" name="subject" value="Feedback from web site">
<input type="hidden" name="redirect" value="http://www.yourdomain.com/thankyou.htm">
- Upload the web page and test the form. Refer
to the
FormMail documentation first if you have any questions about using the
FormMail script.
Entropy Search Engine
This script enables a nice, quick search engine
that can help your visitors find information that they are interested in more
easily. The larger the site, the more important the search engine becomes.
Warning:
This search engine searches all of the ASCII (text) files on your
site. This includes HTML, PERL, plain text files, etc. Since there is no way to
limit the search engine, if any of these files contain sensitive information,
either encrypt the files or remove them from your site. This is a smart move
anyway - you should not store sensitive information on your web site without
encryption.
To create an Entropy Search Engine:
- Click on the Rebuild Search Index
link under Entropy Search in the CGI Center area. This
creates (or recreates) the index file that the search engine uses to find
information.
- Click on the Back button on
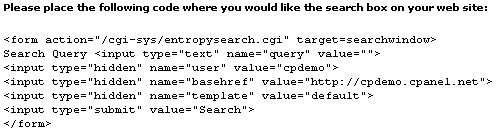
your browser and click on the Setup Search Engine link.
- Copy and paste the HTML code into your web
page.
- Use the Search Query field
to test the script.
This is the minimum
you need to do to get the script working - upload the file, and you're
finished. Refer to
Editing the
search engine template if you need to customize the appearance of the
guestbook.
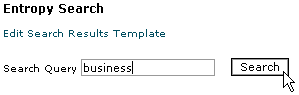
You can alter the appearance of the search
engine template at any time.
To edit the search engine template:
- Click on the Setup Search Engine
link in the CGI Center area.
- Click on the Edit Search Results
Template link.
- Copy and paste any HTML code that you want
into the template to alter it's appearance.
Warning: Make sure you do not delete the <cgi>
tag. This will cause the script to stop working.
- Click on the Save button.
- Use the Search Query field
to test the script.
- Upload the finished HTML page.
You need to rebuild the search engine index
whenever you make changes to your site, otherwise the search engine will not be
able to find the new material.
To rebuild the search index
- Click on the Rebuild Search Index
link under Entropy Search in the CGI Center area.
Entropy Banner
The Entropy Banner script allows you to create
a set of revolving banner images, normally used for advertising. You can upload
and delete files, set priority on the images, and set URLs to which each image
points.
To set up an Entropy Banner:
- Click on the Entropy Banner
link in the CGI Center area.
- Copy and paste the indicated tag into your
web page.
- Change your web page extension from .htm or
.html to .shtml. This is the required file extension to use SSI (Server Side
Includes).
- Click on the Add Banner (s)
button.
- Search for and enter each banner that you
want to upload in the available fields using the Browse...
buttons.
- Click on the Overwrite existing
files tick box if you want to overwrite existing files of the same
name.
- Click on the Upload button.
- If you need to alter the URLs or priority of
the images, go to the next step. Otherwise, upload the web page and test the
script.
- Click on the Modify Rotation
button.
- Click on the High,
Medium, or Low radio buttons for any banner that you
need to change, and click on the Save button. You need to do
this for each banner that you need to alter.
- Enter the URL for each banner image in the
Linked to field, and click on the Save
button. You need to do this for each banner.
- You are now finished. Upload the web page
and test the script.
You can upload banners whenever new banners
need to be added to the rotation. You can specify whether you want the new
banners to overwrite the old ones or not.
To upload new banners:
- Click on the Entropy Banner
link in the CGI Center area.
- Click on the Add Banner (s)
button.
- Search for and enter each banner that you
want to upload in the available fields using the Browse...
buttons.
- Click on the Overwrite existing
files tick box if you want to overwrite existing files with new files
of the same name.
- Click on the Upload button.
- If you need to alter the URLs or priority of
the images, go to
Modifying the rotation and URLs of banners. Otherwise, upload the web page
and test the script.
Modify the rotation of banners, and change
their URLs, as you add and remove banners from your site.
To modify banners:
- Click on the Entropy Banner
link in the CGI Center area.
- Click on the Modify Rotation
button.
- If you need to delete a banner, click on the
Delete button. Deleting and re-uploading banners is the only
way to change their rotation order.
- Click on the High,
Medium, or Low radio buttons for any banner that you
need to change, and click on the Save button. You need to do
this for each banner that you need to alter.
- Enter the URL for each banner image in the
Linked to field, and click on the Save
button. You need to do this for each banner.
- Upload the web page and test the script.